Step-by-Step Testimonial Verification for Marketers

Every testimonial you publish needs to pass six checks before it goes live: confirm identity and purchase, secure written consent with required disclosures, cross-check platform presence, validate media authenticity, log your evidence, and schedule a refresh. That is the core of a solid testimonial validation process — and the rest of this article shows you exactly how to execute each step.
Your one-page verification checklist:
- Step 1 — Capture intake metadata: Record submitter name, email, company, submission date, and source channel.
- Step 2 — Verify identity and purchase: Confirm email domain, match to CRM or order record, or collect receipt/OCR proof.
- Step 3 — Confirm consent and disclosures: Obtain written permission and attach required FTC disclosure language.
- Step 4 — Authenticate media: Check image metadata, video liveness cues, and file properties.
- Step 5 — Cross-platform consistency check: Search the reviewer’s name and handle across LinkedIn, Google, and G2.
- Step 6 — Log evidence and sign off: Store all proof in a timestamped audit file before publishing.
- Step 7 — Schedule a refresh: Flag testimonials for re-confirmation every 12–18 months.
Jump to any section: Step-by-step workflow · Format-specific tactics · Tools and automation · FTC legal requirements · Templates and checklist · Scaling with a platform · Red flags and quick tests
Key Takeaways
A complete step-by-step testimonial verification process requires confirmed identity, documented purchase proof, written consent with FTC-compliant disclosure, authenticated media, cross-platform consistency checks, and a timestamped audit log before any testimonial goes live.
| Point | Details |
|---|---|
| Capture intake metadata first | Record name, email, company, date, and source channel before any other check begins. |
| Receipt/OCR is the highest-trust proof | For B2C and local services, receipt verification confirms a real transaction; B2B uses CRM or contract matching. |
| FTC disclosure is non-negotiable | Material connections must be disclosed clearly and conspicuously — inline, not in a footer or behind a link. |
| Audit logs protect you | Store all evidence in a timestamped folder; retain for at least three years after the testimonial’s last use. |
| Clareefai automates the pipeline | Clareefai handles intake, verification, audit logging, and cross-channel publishing in one platform for B2B teams. |
Table of Contents
- What does step-by-step testimonial verification look like in practice?
- How do you verify different testimonial formats?
- What features should you look for in verification tools?
- What U.S. legal requirements apply to testimonials?
- Copy-and-paste templates: outreach scripts, consent language, and a verification checklist
- How do you scale testimonial verification across a marketing team?
- What are the red flags that signal a fake testimonial?
- The mistake most marketing teams make with testimonial verification
- Clareefai helps you verify and publish testimonials at scale
- Sources
What does step-by-step testimonial verification look like in practice?
Testimonial verification is the process of confirming that a customer review or endorsement is genuine, that the person giving it actually transacted with you, and that your use of it meets U.S. legal requirements. The phrase “testimonial authenticity check” covers the same ground — but in practice, it is an operational workflow, not a single action.
Here is the numbered sequence your team should follow from intake to publish.
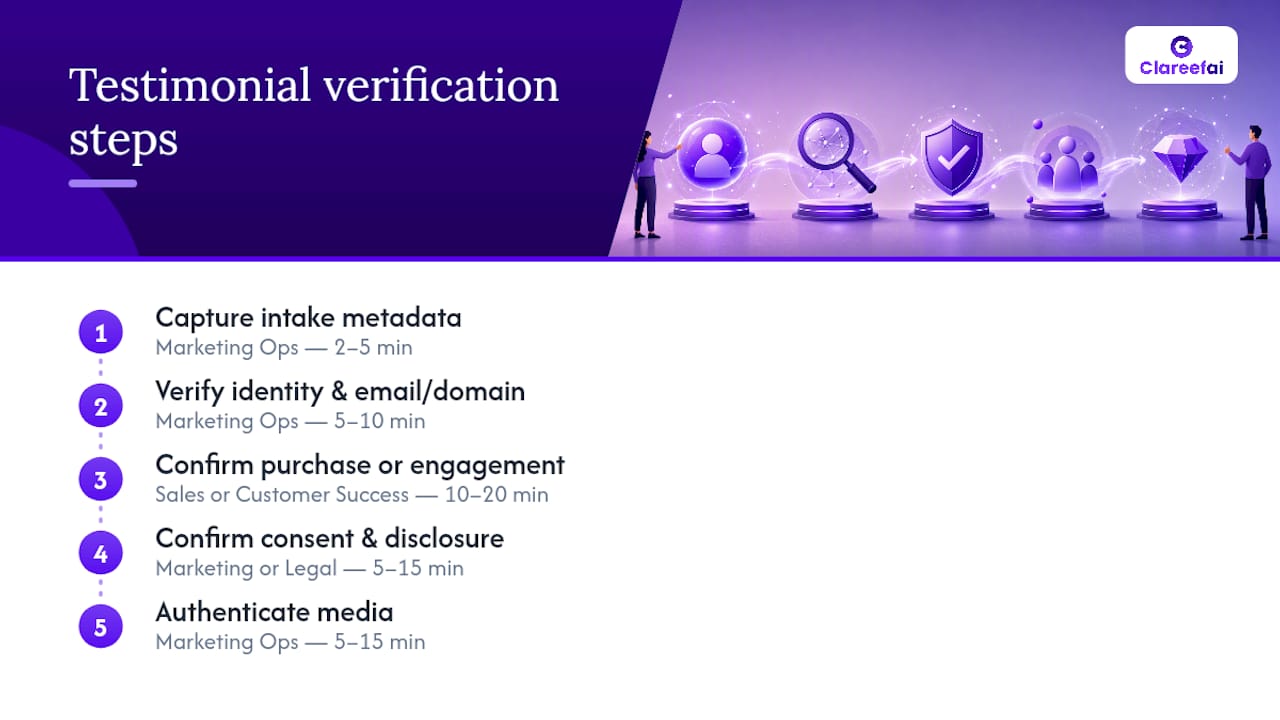
1. Capture intake metadata (Owner: Marketing Ops | Time: 2–5 minutes)
Before anything else, record the submitter’s full name, business email, company name, submission date, and the channel through which the testimonial arrived (email, form, social DM, or sales handoff). This metadata is your chain of custody. Without it, every downstream check is harder to defend.
2. Verify identity and email/domain (Owner: Marketing Ops | Time: 5–10 minutes)
Confirm the submitter’s email address is real and matches a legitimate domain. For B2B testimonials, the domain should align with the company named in the testimonial. A free email address (Gmail, Yahoo) from a claimed enterprise contact is a yellow flag — request a corporate email or a LinkedIn profile URL. Identity and domain verification is the fastest way to eliminate fabricated personas before you invest more time.
3. Confirm purchase or engagement (Owner: Sales or Customer Success | Time: 10–20 minutes)
Match the submitter to a CRM record, an order confirmation, or a signed contract. For B2C or local-service contexts, receipt/OCR verification provides the highest-trust proof: the reviewer uploads a receipt, OCR extracts the business name, date, and total, and the system fuzzy-matches those fields to your vendor record. Receipt-based verification catches fabricated reviews that pass an email check but have no actual transaction behind them.
Escalation rule: If the testimonial will appear in paid advertising, on a product page, or in a press release, require receipt or CRM match. For low-visibility internal sales decks, a confirmed email domain may suffice.
4. Confirm consent and attach disclosure language (Owner: Marketing or Legal | Time: 5–15 minutes)
Collect written consent before publishing. The consent record should capture: permission to use name, photo, and quote; acknowledgment of any material connection (discount, free product, referral fee); and the disclosure language that will appear alongside the testimonial. The FTC Consumer Reviews and Testimonials Rule requires that material connections be disclosed clearly and conspicuously — meaning the disclosure must be unavoidable, not buried in a footer or hidden behind a link.
5. Authenticate media (Owner: Marketing Ops | Time: 5–15 minutes)
For images, check EXIF metadata for creation date and device. For video, look for liveness cues (natural eye blinking, spontaneous speech patterns, background consistency) and inspect file properties for editing timestamps. Screenshots require the original post URL — never accept a screenshot alone.

6. Cross-platform consistency check (Owner: Marketing Ops | Time: 5–10 minutes)
Search the reviewer’s name, handle, and company across LinkedIn, Google Reviews, G2, Capterra, or whichever platforms are relevant to your industry. Cross-platform comparison catches accounts that post identical praise everywhere but have no organic activity — a strong signal of coordinated fake reviews.
7. Log evidence and obtain final sign-off (Owner: Marketing Manager | Time: 5 minutes)
Store all collected evidence (email thread, receipt scan, CRM screenshot, consent form, media file) in a timestamped audit folder. Assign a verification status (Approved / Pending / Rejected) and record who approved it and when. This log is your defense if the FTC or a prospect ever questions a testimonial’s authenticity.
8. Publish and schedule refresh (Owner: Marketing | Time: 2 minutes)
Publish with the appropriate disclosure tag. Set a calendar reminder to re-confirm the testimonial every 12–18 months — customer situations change, and an outdated testimonial can become misleading.
Pro Tip: Triage testimonials before running the full workflow. A low-risk testimonial (existing customer, confirmed CRM record, no material connection, low-visibility placement) can skip to Step 4. A high-risk testimonial (new contact, paid placement, video format, influencer) needs every step. Building a two-tier intake form that routes automatically saves your team hours each week.
How do you verify different testimonial formats?
The verification approach shifts depending on the format. Text, social posts, video, and B2B case studies each carry different fraud signals and require different evidence.
Text reviews
Analyze the language for specific usage details. Generic praise (“Great product, highly recommend!”) with no feature reference or outcome is a weak signal. Genuine customers tend to mention a specific feature, a before/after result, or a named team member. Check the timestamp: a cluster of five-star reviews submitted within 48 hours is a pattern worth investigating. Language detail and timing analysis are among the most reliable first-pass checks available to a marketing team.
Cross-reference the reviewer’s profile on the platform where the review appeared. Look for account age, review history, and whether the account has reviewed other businesses. A profile created the same week as the review, with no other activity, warrants a direct identity confirmation request.
Social posts and screenshots
Never accept a screenshot as standalone proof. Request the original post permalink and verify it is live. Check the account’s follower count, posting history, and account creation date. A follower pattern that jumps sharply around a campaign launch date is a red flag. Confirm the account’s handle matches the name on the testimonial submission.
Pro Tip: When asking customers for social proof, request the post permalink in your outreach rather than a screenshot. One extra sentence in your request email eliminates the most common authentication gap and preserves user experience — customers rarely object to sharing a public link.
Video testimonials
Video requires a short liveness check even when the submitter is a known customer. Watch for: natural eye blinking at irregular intervals, spontaneous speech with self-corrections, and background details that are consistent throughout. Inspect the video file’s metadata for creation date, device, and any editing software flags. Scripted testimonials that read word-for-word from a prompt carry lower authenticity signals than conversational ones — not a disqualifier, but worth noting in your audit log.
For deepfake detection on high-stakes placements (paid video ads, investor presentations), tools that analyze facial movement consistency and audio-visual sync provide an additional layer of assurance. The social proof strategies that move the needle most are those where video authenticity is visibly demonstrated to the viewer.
B2B case studies and reference calls
A written case study needs sign-off via corporate email from the named contact, not a personal address. Match the company and contract details to your CRM or billing records. For reference quotes used in sales decks, a brief reference call (15 minutes, recorded with consent) provides the highest-trust evidence and doubles as a sales asset. Confirm the contact’s title and tenure at the company — a former employee’s quote about a current product is misleading even if the quote itself is genuine.
What features should you look for in verification tools?
The right tool depends on your volume, regulatory exposure, and available ops headcount. Focus on features, not brand names, when evaluating options. Feature-focused evaluation criteria — email/domain checks, OCR, timestamping, and audit logs — are the baseline any credible verification tool should meet.
Must-have vs. nice-to-have features
When to automate vs. keep manual
Automation pays off when your team processes more than 20–30 testimonials per month or when testimonials feed directly into paid advertising. Below that volume, a structured manual checklist with a shared audit folder is often faster to implement and cheaper to run. The decision criteria: volume, regulatory risk (paid ads trigger higher FTC scrutiny), available ops headcount, and budget.
A verified-review pipeline that assigns a confidence score to each testimonial lets your team triage quickly — high-confidence records go straight to publish, low-confidence ones route to a manual review queue. That hybrid model works well for mid-size teams that cannot justify a fully automated stack but cannot afford to manually review every submission either.
Pro Tip: Tag verified testimonials in your CRM with a custom field (e.g., “Verification Status: Approved” and “Verification Tier: Receipt/OCR”). Sales reps can then filter for the highest-trust testimonials when building deal-specific decks, and you get a clean audit trail without any extra work at publish time.
What U.S. legal requirements apply to testimonials?
The FTC Consumer Reviews and Testimonials Rule sets the baseline for every testimonial you publish in the United States. Two obligations apply to every marketing team: testimonials must reflect genuine consumer experiences, and any material connection between the endorser and the brand must be disclosed clearly and conspicuously.
What “clear and conspicuous” means
A disclosure is clear and conspicuous when a consumer cannot miss it. The FTC’s standard requires that disclosures be unavoidable — placed where the reader’s eye naturally falls, in a font and contrast that is readable, and before or alongside the testimonial (not after). Acceptable formats include inline text (“Paid partnership with [Brand]”), a starting hashtag on social posts (#Ad, #Sponsored), or a labeled badge next to the testimonial on a web page.
What does not meet the standard: a disclosure buried in a footer, a “see details” link that requires a click, or a disclosure that appears only on a separate terms page. The FTC has been explicit that consumers should not have to take extra steps to find it.
Material connections that require disclosure
A material connection is any relationship that could affect how a consumer weighs the testimonial. This includes: payment or free product in exchange for a review, an employment or agency relationship, a family connection, and affiliate or referral fees. If your customer received a discount in exchange for their testimonial, that discount is a material connection and must be disclosed.
Compliant disclosure language examples
- On a website testimonial: “[Name] received a 20% discount in exchange for this review.”
- On a social post: “#Ad — I received [Product] at no cost to review.”
- In a video testimonial caption: “Paid partnership with [Brand Name].”
- In a B2B case study: “[Company] is a paying customer of [Brand]. This case study was produced with their cooperation.”
Recordkeeping
Retain your consent proof and verification evidence for at least as long as you use the testimonial, plus a reasonable buffer (many legal teams recommend three years after last use). Store records in a system with access controls so you can produce them quickly in response to an FTC inquiry or a prospect’s due-diligence request.
Copy-and-paste templates: outreach scripts, consent language, and a verification checklist
Email outreach script (identity and purchase confirmation)
Subject: Quick confirmation for your [Brand] testimonial
Hi [First Name],
Thank you for sharing your experience with [Brand]. Before we publish your testimonial, we need to confirm a few details:
- Can you confirm the email address associated with your [Brand] account?
- Could you attach your order confirmation or a receipt from your most recent purchase?
- Please confirm you are comfortable with us using your name, title, and the quote below in our marketing materials.
If you received any discount or incentive in connection with this testimonial, please let us know so we can include the required disclosure.
Reply to this email to confirm, and we will take care of the rest.
Thank you, [Your Name], [Title]
Phone/video call script (brief reference confirmation)
Consent language (written, meets clear-and-conspicuous standard)
One-page verification checklist for intake operators
Use this as a form or a shared doc your team completes for every testimonial before it moves to publish. For testimonial collection best practices that complement this checklist, the Clareefai blog covers the full intake workflow.
Fields to capture:
- Submitter full name, title, company
- Business email address (confirmed)
- Submission date and source channel
- CRM record ID or order confirmation number
- Receipt or OCR scan (attach file)
- Consent form signed (Y/N, attach file)
- Material connection disclosed (Y/N, describe)
- Media files checked (image EXIF / video metadata)
- Cross-platform profile verified (Y/N, note platforms)
- Verification tier assigned (Standard / High-Trust)
- Approved by (name and date)
- Disclosure language confirmed (attach copy)
Escalation triggers: Route to legal review if the testimonial will appear in paid advertising, if the submitter received compensation, or if any identity check returns a mismatch.
Storage: Save the completed checklist and all attachments in a named folder: [CustomerName]_[Date]_Testimonial_Verification. Retain for three years after last use. Restrict folder access to Marketing, Legal, and Customer Success leads.
Pro Tip: When asking customers to submit receipt proof, include a short UX note in your outreach: “A photo of your receipt works perfectly — just make sure the business name, date, and total are visible.” Good image capture dramatically improves OCR accuracy and reduces back-and-forth.
How do you scale testimonial verification across a marketing team?
Scalable verification is a repeatable pipeline with four stages and clear owners: Intake → Verification → Audit → Publish. Without defined roles and handoff triggers, testimonials stall in someone’s inbox or get published without a complete evidence trail.
Workflow narrative
Here is how a mid-size B2B marketing team runs this pipeline end to end:
- Intake (Marketing Ops): A customer submits a testimonial via a web form or a sales handoff. The form captures name, email, company, and submission date automatically. A Zapier workflow pushes the record into the CRM and creates a verification task.
- Verification (Marketing Ops + Customer Success): The ops team runs the email/domain check and pulls the CRM match. Customer Success confirms the account is active and flags any material connection. For high-trust placements, the ops team requests receipt or order confirmation.
- Audit (Marketing Manager): The manager reviews the completed checklist, confirms consent language is attached, and assigns a verification tier. The record is timestamped and stored in the audit folder.
- Publish (Marketing): The testimonial goes live with the appropriate disclosure tag. The CMS record links back to the audit folder ID for traceability.
A step-by-step testimonial workflow that maps these system touches — CRM, CMS, verification platform, and legal sign-off — is what separates teams that scale cleanly from those that create compliance risk as they grow.
Metrics to track
- Verification pass rate: percentage of submitted testimonials that clear all checks. A rate below 70% suggests your collection channel is attracting low-quality submissions.
- Average time-to-publish: from intake to live. Manual workflows typically run 3–7 business days; automated pipelines can compress this to under 24 hours for standard-tier testimonials.
- High-trust proof rate: percentage of published testimonials backed by receipt, contract, or CRM match. This is the figure to show legal and compliance teams.
- Conversion lift: track whether pages featuring verified testimonials outperform pages with unverified social proof. Verified testimonials drive measurable revenue lift for businesses that can demonstrate authenticity to prospects.
Scaling costs and staffing
Manual verification at low volume (under 20 testimonials per month) typically requires 0.1–0.2 FTE of marketing ops time and no dedicated tooling beyond a shared folder and a CRM. At 50–100 testimonials per month, a dedicated verification platform becomes cost-effective. Tool subscription tiers for mid-market platforms generally run $200–$800 per month depending on volume and integrations. Occasional legal review (for paid-ad placements or influencer campaigns) adds $150–$400 per review cycle, depending on your counsel’s rates.
Clareefai handles the collection, verification automation, audit logging, and cross-channel publishing in one platform. For enterprise teams managing hundreds of testimonials across multiple product lines, having a single system of record for verification evidence, consent forms, and publishing status eliminates the coordination overhead that slows most marketing teams down.
Pro Tip: Assign a “Testimonial Owner” role in your CRM — one person per account who is responsible for keeping that customer’s testimonial current. When a customer renews, expands, or hits a new milestone, the owner triggers a re-collection request. This keeps your testimonial library fresh without a separate calendar process.
What are the red flags that signal a fake testimonial?
Most fabricated testimonials fail at least two of these checks. Run them in the first 60 seconds of intake.
Red flags to watch for:
- Timing spike: multiple testimonials submitted within 24–48 hours from unrelated contacts
- Generic language: no specific feature, outcome, or team member named
- Missing usage detail: the reviewer cannot describe how they used the product
- Mismatched domain/email: corporate claim but personal email address
- No cross-platform presence: the reviewer has no LinkedIn, no Google profile, no industry presence
- Overly promotional phrasing: reads like marketing copy, not a customer’s own words
- Profile signals: account created recently, no review history, no connections
Three 60-second tests
- Domain/email check: Paste the submitter’s email domain into a browser. Does the company website exist? Does the contact appear on the team page or LinkedIn? A 30-second search answers this.
- Timestamp pattern scan: Pull the last 10 testimonials received. Do any share a submission window of under 48 hours? Do they share similar sentence structures? A quick visual scan of dates and language catches coordinated submissions.
- Raw media visual scan: For screenshots, right-click and check image properties for creation date. For video, scrub to the 10-second and 30-second marks and watch for background inconsistencies or unnatural eye movement. This takes under a minute and catches the most obvious fabrications.
When a red flag appears: Hold the testimonial, send the identity confirmation email from the templates section, and request higher-trust evidence (receipt, CRM match, or a brief reference call). If the submitter does not respond within five business days or the evidence does not match, discard the testimonial and document the reason in your audit log. Never publish a testimonial you cannot verify — the FTC risk and the reputational cost both outweigh the marginal social proof value.
The mistake most marketing teams make with testimonial verification
The most common operational failure is not a lack of process. It is inconsistent intake. Teams collect testimonials through three or four different channels — a sales rep’s email, a post-demo survey, a social DM, a review platform notification — and none of those channels captures the same fields. By the time someone tries to verify the testimonial, the submitter’s email is buried in a thread, there is no consent record, and the only “proof” is a star rating on a third-party platform.
Star ratings alone are not verification. They tell you a customer felt positively at a moment in time. They do not confirm identity, purchase, or consent to use the quote in your marketing materials.
The single habit that closes most of this gap: always capture a verifiable contact and at least one piece of transaction evidence before the testimonial leaves the collection stage. That means a business email address (not a personal one) and either a CRM record ID or an order confirmation number. Everything else in the verification workflow builds on those two data points. Without them, you are reconstructing the chain of custody after the fact, which takes five times as long and often fails.
Secure testimonial management — with defined retention policies, role-based access, and a single audit folder per testimonial — is what makes that habit stick at scale. The teams that do this well treat every testimonial like a contract: you would not execute a contract without a signature and a record of who signed it.
Pro Tip: Preserve user experience by making the verification request feel like a thank-you, not an interrogation. Frame your outreach as: “We want to make sure your story is represented accurately.” Customers who feel respected respond faster and provide better evidence.
Clareefai helps you verify and publish testimonials at scale
Manually managing a verification pipeline across spreadsheets, email threads, and shared folders works until it does not. For teams processing more than a few dozen testimonials per month, the coordination overhead becomes the bottleneck — not the verification itself.
Clareefai gives marketing and sales teams a single platform to collect, verify, and publish authenticated testimonials without rebuilding the workflow from scratch. The platform’s sales-focused use case is built specifically for B2B teams that need verified proof at every stage of the deal cycle.
What Clareefai delivers for verification-focused teams:
- Receipt/OCR support and CRM matching to confirm purchase proof automatically
- Email/domain verification built into the intake flow
- Immutable audit logs with timestamped evidence for every published testimonial
- Role-based approvals so marketing, sales, and legal each have the right access
- Cross-channel publishing with CMS and CRM integrations that carry verification status through to the live page
Before your demo, prepare a short internal checklist: current monthly testimonial volume, the channels through which testimonials arrive, your existing consent process (or lack of one), and the platforms where you publish. That 10-minute prep makes the demo immediately applicable to your workflow. See how verified testimonials drive win rates for B2B teams, and start your free trial at Clareefai.
Sources
The sources below back the legal, technical, and operational claims in this article. Consult the FTC resource first for policy questions; use the technical and practical sources for implementation guidance.
- Consumer Reviews and Testimonials Rule: Questions and Answers | Federal Trade Commission
- How to Find If Testimonial Are Legit? | What a Story
- 5 Proven Steps to Verify Testimonials in Direct Mail for Authenticity and Trustworthiness
- Top Tools for Testimonial Verification - Robust Branding
For policy questions, start with the FTC’s own Q&A page. For implementation, the Taradel checklist and the CoreVouch receipt-verification writeup give you the clearest operational models. For tool selection, use the Robust Branding feature list as your evaluation scorecard.
Recommended
Share Article
Stay Updated
Get the latest insights on customer advocacy and SaaS growth delivered to your inbox.