Step-by-Step Testimonial Workflow for Marketing & Sales
TL;DR:
- Effective testimonial programs rely on a structured, automated workflow that captures customer advocacy at key milestones. Consistently timing requests, simplifying channels, and leveraging AI tools improve response rates and asset quality across marketing and sales channels.
A repeatable, automated testimonial workflow captures advocates at milestone moments and turns them into verified social proof deployed across every sales and marketing touchpoint. Here is the complete picture in one pass: identify the right customer at the right moment, send a personalized request, schedule and conduct a brief interview, transcribe and edit the raw material, get client approval with a signed release, publish across channels, and repurpose into multiple assets — then automate the whole loop so it runs without daily intervention.
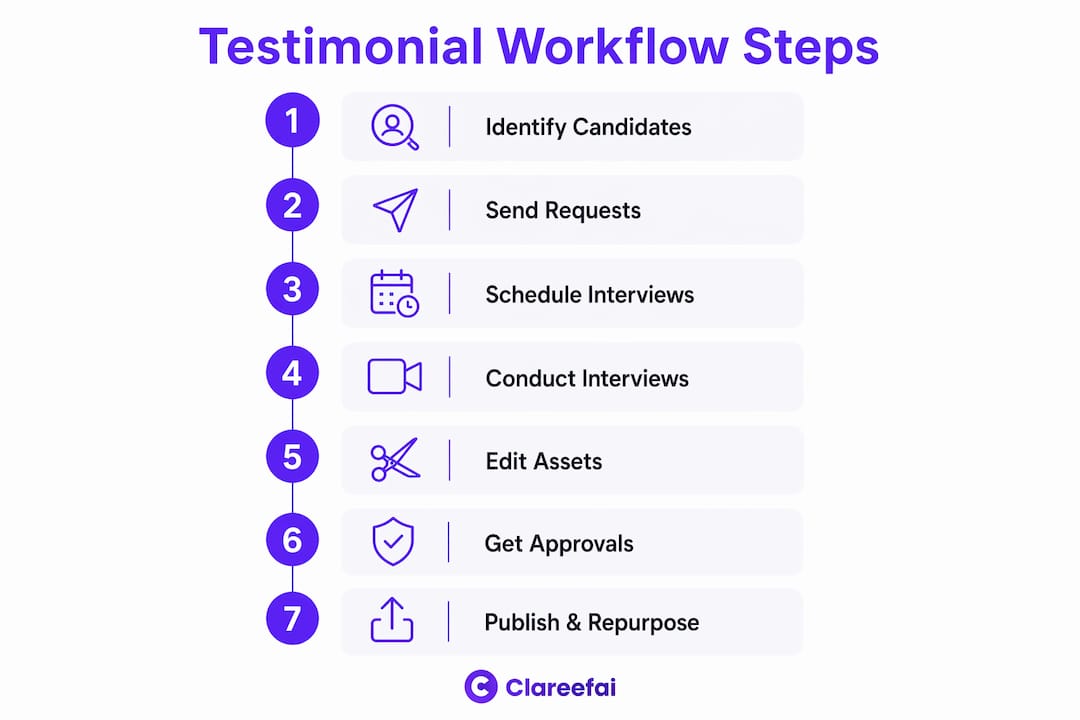
Your 7-step testimonial collection process at a glance:
- Step 1 — Identify: Tag promoters and set milestone triggers in your CRM
- Step 2 — Request: Send a personalized ask via email, in-app, SMS, or LinkedIn DM
- Step 3 — Schedule: Book the interview with a calendar link and send a pre-call brief
- Step 4 — Interview: Run a structured script to capture outcome-driven, quotable testimony
- Step 5 — Transcribe and edit: Convert recordings into 15–60-second clips and short quotes
- Step 6 — Approve: Collect a signed release and get client sign-off on the final asset
- Step 7 — Publish and repurpose: Deploy across website, review sites, email, and sales decks
This guide includes ready-to-use templates, interview scripts, an approval release checklist, automation triggers, KPI targets, and guidance on how Clareefai fits as a testimonial collection process at scale.
Table of Contents
- Step 1: Who should you ask, and when is the right moment?
- Step 2: What should you send, and which channel works best?
- Step 3: How do you schedule and prep customers for a smooth interview?
- Step 4: What questions actually produce quotable, outcome-driven testimony?
- Step 5: How do you turn raw recordings into publish-ready assets?
- Step 6: How do you get client approval and stay legally compliant in the U.S.?
- Step 7: Where should you publish, and how do you repurpose each asset?
- How do you automate and scale the entire workflow?
- What KPIs should you track, and how do you improve over time?
- Three actions to launch your workflow this week
- Key Takeaways
- Why testimonial programs belong in your ops calendar, not your campaign plan
- Clareefai gives your testimonial workflow a permanent home
- Useful sources and further reading
Step 1: Who should you ask, and when is the right moment?
Timing is the single biggest lever in a testimonial program. Requesting a testimonial shortly after a milestone — onboarding completion, a first meaningful result, a contract renewal — produces more specific, emotionally resonant responses than a cold ask weeks later.
Candidate profiles worth prioritizing:
- NPS promoters (score 9–10) flagged in your survey tool
- Accounts that hit a measurable outcome (revenue gained, time saved, churn reduced)
- Strategic logos whose names carry weight with your target buyers
- Customers who sent unsolicited praise via email or support chat
Milestone triggers to configure in your CRM or automation engine:
- Onboarding marked complete
- First invoice paid or first renewal signed
- Support ticket closed with a high CSAT rating
- Product milestone achieved (e.g., 100th report generated, 1,000th user added)
- NPS survey response of 9 or 10 received
Tag these accounts with a “testimonial candidate” field and set a workflow rule that creates a task for the account owner within 24 hours of the trigger firing. That task is the human checkpoint before the automated request goes out.
Pro Tip: When a customer sends informal praise in an email or Slack message, reply with a micro-commitment: “Would you be open to sharing that in a short written quote we could use on our site?” A one-sentence yes is all you need to move them into the request stage — no cold outreach required.

Step 2: What should you send, and which channel works best?
Short, specific, low-friction requests consistently outperform long, formal ones. Sourcing customers who already expressed positive sentiment and making it easy to reply are the two variables that move response rates most reliably.
Three email templates to adapt:
Template A — Initial ask (primary email):
Subject: Quick favor — share your experience with [Company]?
Hi [First Name], you recently [achieved outcome / completed onboarding]. Would you be willing to share a short quote or 2-minute video about your experience? It takes less than five minutes and helps buyers like you make faster decisions. [Link to submission page]
Template B — Reminder (Day 4):
Subject: Still interested? Takes 2 minutes
Hi [First Name], just following up on my earlier note. If you have 2 minutes, [link] is all you need. No editing, no polish required — your honest words are what matter.
Template C — Easy opt-in (Day 8, last touch):
Subject: One sentence is enough
Hi [First Name], even a single sentence works. Reply to this email with what you’d want a peer to know about [Product], and I’ll handle the rest.
Channel selection guidance:
- Email: Default for B2B; works for all account types
- In-app message: Best for active daily users who are already in the product
- SMS: Reserve for high-touch, high-value accounts where you have explicit consent
- LinkedIn DM: Effective for executive contacts who are more responsive on LinkedIn than email
Send requests within 24–48 hours of a “wow moment,” and schedule delivery for Tuesday through Thursday, 10 AM–2 PM in the recipient’s timezone. Avoid Mondays and Fridays for B2B outreach. Run a cadence of initial ask plus two reminders; a third follow-up rarely improves response and can damage the relationship.
Pull personalization tokens from your CRM: first name, company name, specific outcome achieved, and the name of their account manager. Generic requests get ignored; specific ones get answered.
Step 3: How do you schedule and prep customers for a smooth interview?
Logistics friction kills participation. A calendar link in the initial request removes one round of back-and-forth immediately. For written testimonials, a Google Form or a dedicated submission page works just as well.
Scheduling best practices:
- Use a scheduling tool (Calendly, HubSpot Meetings, or Chili Piper) so customers self-select a time
- Offer two format options upfront: a 15–30-minute video call or a written response form
- Keep video calls to 15 minutes for quotes and 30 minutes maximum for full case study interviews
- Confirm with a calendar invite that includes a one-paragraph agenda and the tech checklist
Pre-call brief to send 24 hours before:
What we’ll cover: Three to four questions about your experience and results. No preparation needed. Tech check: Stable internet, headphones or a quiet room, camera on if comfortable. Recording notice: We’ll record for transcription only. You’ll approve the final quote before anything is published. Time: 15 minutes maximum.
Pro Tip: Offer a screen-recording option for technical customers who prefer to demo their workflow while narrating. Tools like Loom make this a one-click submission. You get richer, more specific content — and they spend zero time on a call.
Proactive scheduling and reference call management also reduce the load on customer success teams by batching requests around natural account touchpoints rather than interrupting customers at random.
Step 4: What questions actually produce quotable, outcome-driven testimony?
Generic questions produce generic answers. A structured script with outcome-first prompts is what separates a usable testimonial from a vague “great product, highly recommend.”
Sample interview script:
Intro (30 seconds): “Thanks for making time. This is just a conversation — there are no wrong answers. We’ll record for transcription, and you’ll see the final quote before anything goes live. Ready?”
Core questions:
- Outcome first: “What’s the most concrete result you’ve seen since using [Product]?”
- Challenge: “What problem were you trying to solve before you found us?”
- Decision factors: “What made you choose [Product] over other options?”
- Metrics: “Can you put a number on the impact — time saved, revenue influenced, tickets reduced?”
- Unexpected benefit: “Was there anything that surprised you about working with us?”
- Closing line: “How would you describe [Product] to a peer in one sentence?”
Follow-up prompts to coax specifics:
- “Can you give me an example of that?”
- “What did that look like in practice?”
- “Roughly what percentage or dollar amount are we talking?”
For written responses, send the same six questions in a form with character limits (150–300 characters per answer). Short fields produce tighter, more quotable answers than open text boxes. For live interviews, let the customer finish their thought before prompting — interrupting breaks the narrative flow and produces choppy transcripts.
Step 5: How do you turn raw recordings into publish-ready assets?
Recording quality determines how many formats you can extract from a single session. A well-lit, clearly recorded 20-minute interview can yield a 60-second highlight clip, three pull quotes, a written case study paragraph, and a social card — all from one conversation.
Recording best practices:
- Record at 1080p minimum; most modern smartphones handle this natively
- Ask customers to sit facing a window (natural light) or use a ring light
- Use a headset or external microphone; built-in laptop mics introduce background noise
- Export as MP4 for video and MP3 for audio-only assets
Recommended editing workflow:
- Auto-transcribe using a transcription tool (Otter.ai, Rev, or Descript)
- Timestamp the three to five strongest quotes in the transcript
- Edit the full recording into a 15–60-second highlight clip
- Pull two to three written quote variants from the transcript
- Add captions to every video clip (required for accessibility and social autoplay)
- Export a plain-text transcript for alt text and SEO use
Pro Tip: Build a simple video template in a tool like Canva or Adobe Express with your brand colors, logo placement, and caption style. Batch-editing five clips in one session using the same template takes roughly 30 minutes and produces a consistent visual identity across all assets.
Accessibility checklist before publishing:
- Closed captions on all video clips
- Full transcript available as a downloadable or expandable text block
- Alt text on quote card images describing the speaker and key claim
- Audio-described version for any screen-recording demos
Video conveys emotion and authenticity in ways written quotes cannot, and smart repurposing multiplies a single recording into assets that serve every channel in your mix.

Step 6: How do you get client approval and stay legally compliant in the U.S.?
Every testimonial asset needs a signed release before it enters any marketing channel. This protects both parties and creates an auditable record you can retrieve when a legal or compliance question arises.
Standard approval steps:
- Send the edited draft (quote or clip) to the customer contact for review
- Request written sign-off via email or a digital signature tool (DocuSign, HelloSign)
- Collect the release form covering public use, logo display, and any metrics cited
- Store the signed release alongside the asset in your content repository
Release form fields to include:
- Full name, job title, and company
- Specific asset(s) covered (quote text, video clip filename)
- Permission scope: website, social media, paid ads, sales decks, press
- Logo and company name usage permission
- Date of signature and expiration (if applicable)
On the legal side, the FTC’s endorsement guidelines require disclosure of any material connection between your brand and the person giving a testimonial. If you offer a gift card, discount, or other incentive in exchange for a testimonial, that connection must be clearly disclosed wherever the testimonial appears. For unpaid, voluntary testimonials from genuine customers, no disclosure is typically required — but the FTC’s guidance is the authoritative reference, not SEO guides.
Including permission metadata — photo, name, title, company — and an explicit publish permission in your release form increases trust and reduces legal friction at every stage. Store signed releases in a folder structure tied to the asset ID so any team member can retrieve the authorization in under two minutes.
For secure storage and privacy controls across your testimonial library, secure testimonial management practices should be part of your standard operating procedure from day one.
Step 7: Where should you publish, and how do you repurpose each asset?
One raw testimonial can serve six to eight distinct formats if you plan the repurpose matrix before you publish. The goal is maximum coverage from minimum production effort.
Primary publish channels:
- Website: Homepage hero, product pages, pricing page (place near the decision point), and a dedicated testimonials or case studies page
- Review sites: Google Business Profile, G2, Capterra, or industry-specific directories
- LinkedIn: Native video posts, quote graphics, and company page updates
- Email sequences: Onboarding nurture, sales follow-up, and renewal campaigns
- Sales enablement: Slide decks, one-pagers, and battlecards segmented by persona or use case
Repurpose matrix — one raw asset, multiple outputs:
| Raw Asset | Derived Format | Best Channel |
|---|---|---|
| 20-min video interview | 60-second highlight clip | LinkedIn, website hero |
| 20-min video interview | 15-second quote clip | Paid social, email header |
| Full transcript | 2–3 pull quotes | Sales deck, pricing page |
| Full transcript | Blog case study paragraph | SEO content, newsletter |
| Pull quote | Branded quote card (image) | LinkedIn, Instagram |
| Pull quote | Sales email snippet | SDR outreach sequences |
Placement timing rules: Put outcome-focused testimonials near pricing pages, where buyers are weighing cost against value. Feature challenge-and-solution testimonials on product pages, where buyers are evaluating fit. Use short, punchy quotes in email subject lines and preview text to lift open rates.
Publishing metadata checklist:
- Tag each asset by persona, use case, product module, and acquisition channel
- Record publication status (draft, pending approval, live, archived)
- Note the release expiration date if the customer set one
- Assign an asset owner responsible for updates and reuse tracking
Mapping testimonials to specific sales motions is covered in depth in the B2B social proof workflow guide, which connects asset placement to conversion hotspots across the funnel.
How do you automate and scale the entire workflow?
Manual testimonial programs plateau fast. Once you have validated the workflow with a small cohort, automation is what converts a one-time effort into a closed-loop customer feedback workflow that runs continuously.
Compact automated flow:
Trigger detection → validation check → personalized request generation → scheduled delivery → follow-up sequence → collection and routing → approval workflow → tagging and storage → publish pipeline → owner notification (closed loop)
Integration points to configure:
- CRM: Contact record updates, deal stage changes, and event logs as trigger sources
- Product telemetry: Milestone events (feature adoption, usage thresholds) piped via webhook
- Payment processor: Invoice paid or subscription renewed as a trigger
- Support/NPS tool: CSAT score above threshold or NPS promoter response
- Calendar and storage: Auto-scheduling links and a structured content repository (Airtable, Notion, or your CRM’s document module)
Every automation node needs an assigned owner and a defined SLA. Without ownership, approvals stall and assets never reach the publish pipeline.
| Automation Event | Owner | SLA | Output Asset |
|---|---|---|---|
| Onboarding complete | Customer Success Manager | 24 hours to send request | Personalized email request |
| NPS promoter response | Marketing Ops | 48 hours to route | Testimonial submission link |
| Testimonial submitted | Marketing Coordinator | 48-hour review window | Approved or rejected asset |
| Asset approved | Content Manager | — | Live testimonial on designated channel |
| No response after Day 7 | Automation | Automatic | Sequence closed, CRM logged |
Clareefai is built specifically for this layer of the workflow. Its AI-powered promoter identification surfaces the right candidates automatically, its collection pages handle submission and verification, and its multi-channel publishing integrations push approved assets to your website, CRM, and review platforms without manual handoffs. For teams managing dozens of accounts, unified testimonial management through a single platform removes the bottlenecks that kill most manual programs. A marketing automation checklist can help you scope which automation triggers to configure first before connecting them to your testimonial pipeline.
What KPIs should you track, and how do you improve over time?
Measurement turns a testimonial program from a creative exercise into a revenue function. Track these metrics weekly and monthly to know whether the workflow is performing and where to optimize.
Core KPIs and sample targets:
| KPI | Definition | Sample Target |
|---|---|---|
| Ask-to-response rate | Testimonials submitted / requests sent | 20% |
| Publish rate | Assets published / testimonials collected | 70% |
| Asset reuse rate | Times an asset is used in campaigns / total assets | 3+ uses per asset |
| Time-to-publish | Days from submission to live asset | Under 7 days |
| Close-the-loop rate | Customers notified of publication / total published | 80% |
| Conversion lift | Landing page CVR with testimonial vs. without | Measure by A/B test |
Optimization checklist — run quarterly:
- A/B test subject lines on the initial request email (outcome-specific vs. relationship-based)
- Shorten the submission form if completion rates drop below 50%
- Vary the ask timing by persona (executives respond better to Friday morning; practitioners to Tuesday midday)
- Test testimonial placement on pricing pages against a control with no social proof
- Review the asset reuse rate and retire or refresh assets older than 12 months
Customer feedback initiatives that close the loop consistently tend to produce stronger advocacy outcomes over time, because customers who see their input acted on are more willing to participate in future programs. Track your close-the-loop rate as a leading indicator of future advocacy pipeline health.
A monthly 15–30-minute “cleanup” session where your team manually reviews and re-tags testimonials keeps automated displays accurate and relevant to specific pages — pricing, product features, or industry verticals.
Three actions to launch your workflow this week
You do not need a perfect system to start. Three focused actions this week will put your first testimonials in motion.
-
Tag five candidate accounts today. Open your CRM, filter for NPS promoters or accounts that hit a key milestone in the last 30 days, and add a “testimonial candidate” tag. Set a follow-up task for the account owner due within 24 hours.
-
Send the initial request using Template A. Personalize it with the customer’s name, the specific outcome they achieved, and a direct link to a short submission form or calendar booking. Send Tuesday through Thursday, 10 AM–2 PM in their timezone.
-
Set one automation to capture and route incoming assets. Connect your submission form to a Slack or email notification for your marketing coordinator, log the response in your CRM or Airtable, and assign a 48-hour review SLA. That single automation closes the loop from submission to approval without any manual tracking.
Key Takeaways
A testimonial program only compounds in value when it runs as a closed-loop operational system — collect, act, close the loop, and publish — not as a one-off campaign.
| Point | Details |
|---|---|
| Timing drives quality | Request testimonials within 24–48 hours of a milestone for the most specific, usable responses. |
| Automate the full loop | Configure trigger detection, personalized requests, follow-up sequences, and approval SLAs so the workflow runs without daily oversight. |
| Repurpose every asset | One 20-minute interview can yield six or more derived formats across website, social, email, and sales channels. |
| Measure what moves revenue | Track ask-to-response rate, publish rate, asset reuse rate, and conversion lift to demonstrate ROI and find optimization points. |
| Clareefai reduces manual bottlenecks | Clareefai’s AI-powered platform handles promoter identification, collection, verification, tagging, and multi-channel publishing in one place. |
Why testimonial programs belong in your ops calendar, not your campaign plan
Most teams treat testimonial collection as a marketing campaign: a burst of activity, a handful of assets, then silence until someone asks for more social proof. That model produces inconsistent results and leaves most of your happiest customers untapped.
The teams that consistently build strong advocacy pipelines treat testimonials the way they treat pipeline reviews: as a recurring operational function with owners, SLAs, and metrics reported to leadership. Customer success owns the trigger identification. Marketing ops owns the automation and approval workflow. Sales enablement owns the asset tagging and distribution. When each role has a defined lane, the program scales without depending on any single person’s initiative.
Closing the loop matters more than most teams realize. Telling a customer that their testimonial is now live on your pricing page, or that their feedback shaped a product change, creates a moment of genuine connection that increases their willingness to participate in future case studies, reference calls, and advocacy programs. It is also the step most teams skip entirely, which is exactly why doing it consistently becomes a competitive differentiator.
The advantages of video testimonials are well-documented for B2B buyers, but the operational discipline behind collecting them consistently is what separates programs that produce one great video per quarter from programs that produce a steady stream of verified, attributed assets that sales can use in every deal.
Clareefai gives your testimonial workflow a permanent home
Most of the friction in a testimonial program lives between collection and publication: assets sit in inboxes, approvals stall, and tagging never happens. Clareefai is built to eliminate exactly that gap.
The platform maps directly to every step in this workflow. AI-powered promoter identification surfaces your best candidates automatically. Branded collection pages handle submission and consent in one step. Verification confirms customer identity so every testimonial carries real attribution. Automated tagging by persona, use case, and product module means your sales team can find the right asset in seconds. Multi-channel publishing pushes approved content to your website, CRM, and review platforms without manual handoffs. Role-specific dashboards give marketing, sales, and customer success a shared view of what is live, what is pending, and what is performing.
See how unified testimonial management works in practice, or explore the full platform to request a demo and see how Clareefai fits your existing CRM and marketing stack.
Useful sources and further reading
The sources below back the claims in this guide and offer deeper reading on automation blueprints, legal guidance, and measurement benchmarks.
- Closing the loop: Automating immediate action on customer feedback | Bitrix24 — Covers milestone-based timing and closed-loop automation; use this for configuring CRM trigger rules.
- Customer feedback workflow: Turn insights into action & growth | Moxo — A 10-stage workflow covering capture, routing, ownership, and SLAs; the authoritative reference for closed-loop operations.
- How to Build a Customer Feedback Loop That Actually Works | Heedback — A practical five-stage framework for teams of any size; useful for the approval and measurement sections.
- How to Automate Testimonial Collection | TestiGather — Timing cadences, response-rate guidance, and a five-stage automation workflow; primary reference for Steps 2 and 9.
- How to Request, Acquire, and Display Customer Testimonials | DreamHost — Candidate selection, low-friction asks, and video repurposing best practices.
- Customer Testimonial Collection Automation Implementation Guide | StackForPros — A detailed technical blueprint for building a trigger-based, AI-powered collection system; consult this for the full automation architecture.
- 12 Testimonial Guidelines to Ensure You’re Not Breaking the Law | Boast — U.S.-focused legal best practices for release forms, attribution, and permission metadata.
- FTC Disclosures 101 for Social Media Influencers | FTC.gov — The primary U.S. government source for endorsement disclosure requirements; consult this before publishing any incentivized testimonial.
- Customer Feedback Automation for Modern CX Teams | SurveyBox — Six-step automation blueprint with owner assignment, SLA recommendations, and audit trail guidance; use for the measurement and KPI sections.
Recommended
Share Article
Stay Updated
Get the latest insights on customer advocacy and SaaS growth delivered to your inbox.